The topic of 10 quick productivity tips for Microsoft 365 mobile apps is currently the subject of lively debate — readers and analysts are keeping a close eye on developments.
This is taking place in a dynamic environment: companies’ decisions and competitors’ reactions can quickly change the picture.
Most of us work with Word, Excel, PowerPoint, and other Microsoft 365 apps primarily on a computer, via the desktop or web apps. While you’re on the go, the mobile versions of these apps are handy for reviewing documents, spreadsheets, presentations, or other Office files, and you can use them to do minor editing.
But the mobile apps also have specific functions designed for your smartphone’s smaller screen and touch interface that can help you do more in-depth work. In this guide, we’ll explain what these mobile-first features are and how to use them.
Note: This guide refers to the individual Word, Excel, Outlook, OneNote, and PowerPoint mobile apps for Android and iOS. There’s also a general Microsoft 365 app (which Microsoft confusingly renamed “Microsoft 365 Copilot”) for both platforms that includes versions of Excel, PowerPoint, and Word built into it. But some of the features covered in this guide are not available in these apps within the M365 Copilot app, so we prefer to use the individual apps.
Also note that some users now have access to some Copilot generative AI features within the individual mobile apps as well as in the broader M365 Copilot app. In this article, we’re focusing on features that are available to all Microsoft Office users; we’ll do a follow-up story on using Copilot in the mobile apps.
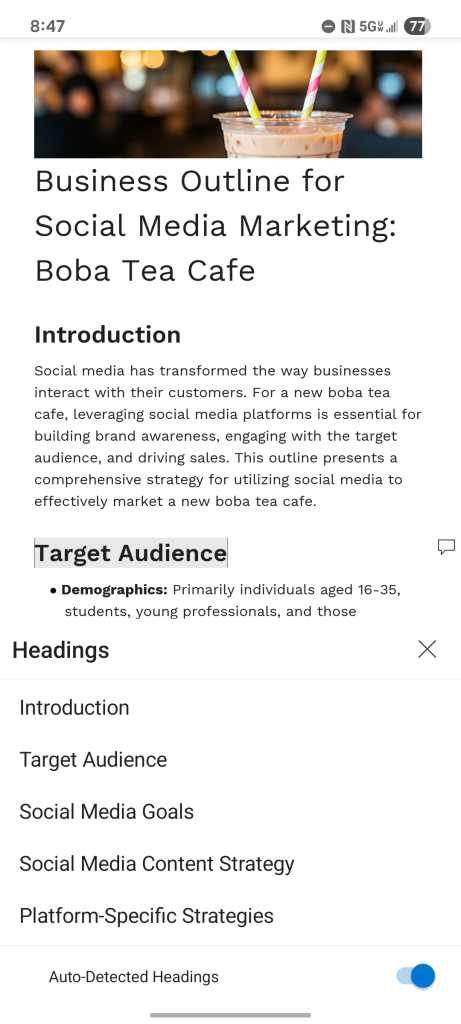
When you load a document in the Word app, it’s shown in Mobile View — its text and layout are formatted to make for easier reading on your smartphone display.
Documents open in the Word mobile app in a clean view that’s easy to read on a small screen.
You can use the familiar pinch-and-spread gestures on the touchscreen, zooming in to enlarge the text or zooming out to shrink it down. When you do, the text automatically adjusts to fill the screen at its new size. And when you hold your phone horizontally, the document is automatically reformatted to fit this wider view.
Tapping the Print Layout button (a piece of paper with right angles at the four corners) on the toolbar below will show how your document would look if printed on paper. Tap Mobile View (a smartphone icon) to return it to this view mode.
If your document is separated into headings, Word’s Headings feature helps you quickly navigate through your document.
On Android: Tap Headings on the toolbar to open a panel that lists the headings in your document. Tap a heading to immediately scroll down to it in your document.
On iOS: Tap the three-dot icon at upper right. On the screen that appears, scroll down and tap Headings. You’ll see a panel that lists the headings in your document. Tap a heading to jump to it in the doc.
This feature can be a useful way to review a document as you’re driving or walking. Tap Read Aloud (an icon of a capital A with sound waves coming out) on the toolbar, and a digital voice will immediately start reading your document.
A control bar appears at the bottom of your document with buttons you can tap to pause/play, or to skip to the previous or next headline or section in your document. You can also tap the Audio Settings button (a speaker with a gear) and adjust the digital voice to read faster or slower, or change its gender between female and male.
If you need to keep your eyes up, you can have Word read your document out loud.
You can dictate words onto a document in the Word app or onto a note in the OneNote app — a much quicker way to capture your thoughts than trying to type on a tiny touchscreen keyboard.
With your document or note loaded in the Word or OneNote app, tap somewhere inside the document or note. A text formatting toolbar appears toward the bottom of the screen. On Android, you’ll see a microphone icon above the right end of the formatting toolbar; on iOS the microphone icon is part of the toolbar, toward the left. Tap the microphone icon and, if necessary, grant Word permission to use your phone’s microphone.
Then start speaking into your phone mic. Your spoken words will be transcribed into the document or note.

As soon as you tap the microphone, a dictation toolbar appears below the text formatting toolbar. It has a pulsing blue microphone button that lets you know it’s actively listening to you. To pause dictation, tap the microphone button, and it turns white. Tap it again to resume dictation.
Of course, this tool works best if you speak clearly and slowly. When it comes to punctuation, you can say “period” to trigger the tool to end a sentence with a period, “comma” to insert a comma, or “new line” to start a new paragraph. (Tap the question mark icon on the right side of the dictation tool to see a list of punctuation, editing, and formatting commands you can say.)
But these commands often don’t work reliably, since the technologies can’t always distinguish whether you’re giving it a command or if you intend these words to be transcribed. So you may find it easier to just tap on the appropriate punctuation button on the dictation toolbar as you’re speaking.
You can also try enabling auto-punctuation. Tap the gear icon on the dictation toolbar to open the “Dictation settings” panel, then switch on Enable auto-punctuation. If you do, the dictation tool will try to fill in commas, periods, and question marks where they logically belong.
Also on this panel in the Android app, you can change the language that the dictation tool recognizes. If you normally work in English but want it to transcribe words you speak in French or Spanish, for instance, changing this setting will make it correctly transcribe your words in that language. The dictation tool currently supports about a dozen languages, with about 35 more in preview.
The dictation tool may not always transcribe your words perfectly. Be sure to review transcribed text and fix any errors.
Note: You may ask why you should use the dictation tool in Word or OneNote rather than a dictation app that may already be on your smartphone. for example, Google’s Gboard keyboard app has a dictation tool that works similarly. Our advice: try both and decide which responds best to the way you speak.
If you have a spreadsheet with one or more tables on it, the Excel mobile app has a feature that can present them for better viewing on your smartphone. Cards View reformats the rows of a table as cards that you can scroll through. This also helps to make these rows easier to edit using your phone touchscreen.
Open a spreadsheet that has a table on it in the Excel app, then tap any cell inside the table. Then on the toolbar that appears below, tap the second icon from the left, the Cards View icon.
The table’s rows will be formatted as a series of cards, each of which displays a summary of the row’s contents. You can scroll down and up this list of cards.
When you tap a card, it expands. You can view all the data in that table row and edit any value by tapping it. Tap PREVIOUS or NEXT at the bottom of the screen to move through the row cards.
To delete a row or add a new row, tap the three-dot icon on the card and select Delete, Insert Above, or Insert Below from the menu that opens.
When you launch the Outlook app, tap Calendar on the toolbar along the bottom. This switches to the calendar. If there’s a date with one or more events on it, tapping it will open a schedule for that day, organized by hour.
Tap the calendar icon at the upper right (to the left of the magnifying glass icon). On the panel that opens, select Agenda. This will list the calendar dates line-by-line; you can scroll up and down to see dates in the past and future that have events scheduled. To return to a regular calendar view, tap the calendar icon at the upper right and choose Day, 3 Day, or Month.
Outlook’s Agenda view gives you a quick, scrollable overview of all your upcoming events.
Tap a date on the calendar, then tap the + icon on the lower right. On the next screen, fill out the New Event form with the event title, names of people you want to invite, start and end times, location, and so on.
After you’ve filled out the details you want, tap the checkmark at the upper right. The new event will appear on your calendar, and your invitees will be notified via an Outlook email.
To edit or delete an event that you’ve created, tap the event on the calendar to open it. On the screen that appears, tap the pencil icon at the upper right. Make whatever changes you like, then tap the checkmark at the upper right. To delete it, tap the Delete Event button at the bottom of the screen, then tap Delete Event again to confirm. Your invitees will be notified of the changes or cancellation.
On Android: Tap the calendar icon in the upper-left corner. On the side panel that opens, tap the gear icon to open Settings. Then under “Quick Settings,” tap Notifications. On the Notifications screen, tap the Calendar tab toward the upper right.
On iOS: Tap your profile picture or initial in the upper-left corner. At the very bottom of the side panel that opens, tap the gear icon to open Settings. Under “Quick Settings,” tap Notifications & Sounds. On the Notifications screen, tap the Calendar tab toward the upper right. Make sure the Allow Notifications toggle is turned on.
In either OS, you can tap Events on the Calendar page to set how far in advance you want to be notified of scheduled events, anywhere from 5 minutes before to 1 week before. Next, tap All day or All day events to set the default notification time for events that are set for a certain day but without a specific start or end time. You can choose to be notified of an all-day event on the morning of that date, the day before, or the week before.
One function in the OneNote app makes it unique from its desktop and web app counterparts: It’s convenient to use it to make quick doodles and sketches, using your phone’s touchscreen to draw.
On Android: Launch the OneNote app and tap the pen tip icon on the toolbar along the bottom. A new blank note will open with a drawing toolbar along the top. You can immediately start drawing on the note with your finger.
To change the drawing color, tap the leftmost pen tip icon on the toolbar. A panel will open to let you select a new color. You can also adjust the thickness of the drawing line by moving the slider along the bottom of this panel. There’s also a second pen and a highlighter – either can also be adjusted by tapping on them to open the same panel that lets you change its color and line thickness.
The remaining tools are an eraser (select this and tap on something you drew to remove it), shapes tool (to draw shapes, lines, or graphs), and a lasso (to select drawn objects so that you can resize them, move them to another spot on the note, or cut or copy them to your phone’s clipboard).
To undo a drawing action, tap the arrow at the upper right that’s curved counterclockwise. To restore it (after you’ve undone it), tap the arrow that’s curved clockwise.
On iOS: Launch the OneNote app, start a new note, and tap the pen tip icon at the upper right. You can immediately start drawing on the note with your finger.
A drawing toolbar appears along the top that looks similar to the Android toolbar but is less fully featured. There’s one pen, the highlighter, the eraser, the lasso, and the undo arrow. The color and thickness of the pen and highlighter are not adjustable. (The drawing tool in the OneNote for iPadOS app does offer the full feature set.)
If you’ll be showing a presentation at an upcoming meeting, the PowerPoint app can help you practice your speech. Its Rehearse with Coach tool will give advice and rate the clarity and pace of your speaking. It doesn’t alter the presentation file itself.
With your presentation file open in the PowerPoint app, tap the three-dot icon at the upper-right corner. On the menu that appears, scroll down and select Rehearse with Coach. If asked, grant the app permission to use your microphone.
Speaking into your phone’s mic, start reading your prepared speech aloud or improvising from your notes. As you talk, Rehearse with Coach will give you on-screen words of advice and encouragement, and rate the clarity of your voice. A timer helps you track how long you’ve been talking.
PowerPoint’s Rehearse with Coach feature listens to your presentation, providing advice and encouragement.
To advance to the next slide, tap the right arrow on the slide or swipe to the left. (Tap the left arrow or swipe right to return to the previous slide.)
When you’re finished with your practice, tap the stop button at the lower right. A report that rates your performance and offers advice will be generated.
Why it matters
News like this often changes audience expectations and competitors’ plans.
When one player makes a move, others usually react — it is worth reading the event in context.
What to look out for next
The full picture will become clear in time, but the headline already shows the dynamics of the industry.
Further statements and user reactions will add to the story.