The topic of Microsoft Teams cheat sheet: How to get started is currently the subject of lively debate — readers and analysts are keeping a close eye on developments.
This is taking place in a dynamic environment: companies’ decisions and competitors’ reactions can quickly change the picture.
If your organization uses Microsoft 365 (a.k.a. Office), chances are you’ve encountered Teams, at least for video meetings. But it’s capable of a lot more, providing an effective way for groups of people to collaborate on work and advance business objectives.
Teams is, at its core, group chat software with videoconferencing capabilities and some interesting features around working with documents and spreadsheets, especially those stored in SharePoint and OneDrive for Business. In other words, it’s a collaboration hub. Teams can be bundled with Microsoft 365 plans, and it’s also available as a standalone subscription for both enterprise and small business customers.
Once you get to know it, Teams is a genuinely helpful tool for teams in companies that use Microsoft 365, since it brings together a bunch of suite components and surfaces them in one convenient place.
It’s available as a web app, desktop application (Windows, macOS, Linux), and mobile app (iOS, Android). Microsoft regularly releases updates to the Teams apps, usually with minor user interface refreshments, but sometimes they’re major updates with significant performance improvements, UI changes, and/or new features.
This guide covers the essentials for getting started with Teams and working efficiently within the platform. We also cover extras such as using Microsoft Loop components in Teams and practical use cases for Microsoft’s ubiquitous generative AI tool, Copilot. In this story we’ll demonstrate in the Mac app, but you’ll find that Teams works similarly in any environment.
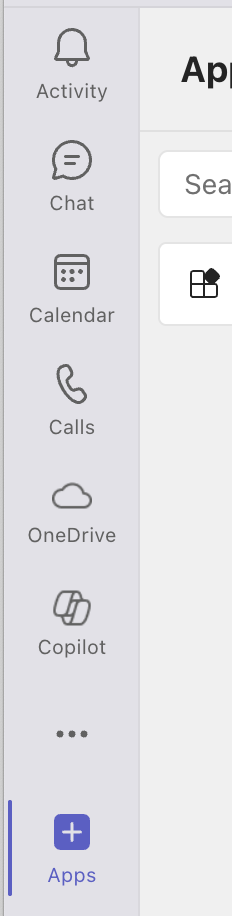
The navigation bar on the left side of the Teams window is your primary way to move through the app.
Understanding these core sections will help you navigate Teams effectively. Note that, depending on your organization’s configuration, not all of these options may be available to you:
The navigation bar is customizable — you can reorder items by dragging them or pin frequently used apps for quick access. You can also add things to the navigation bar by clicking the three dots. A few minutes spent rearranging and adding/removing can make your regular daily Teams use much more snappy, without a lot of friction.
One of the most significant recent changes to the Teams app is the unified chat and channel interface. In Teams, chats are private conversations (one-on-one or with a small group) that you start on the fly, whereas teams are set up for specific groups of people who need to collaborate on an ongoing basis. A team can be a small group you’re working with on a project, your whole department, or in some cases even the entire company. Each team has one or more channels where members collaborate (more on this later in the story).
Until recently, Chats and Teams/Channels were entirely separate sections in Teams, but an interface update has put all conversations in the same place. Here’s how to navigate:
This change initially confused many users, but the unified approach aims to reduce switching between chats and channel conversations.
The search bar at the top of Teams is one of its most powerful features for finding messages, files, people, and more. You can search for messages in chats and channels, files and documents stored in your OneDrive for Business or any linked SharePoint libraries, interactions with people in your organization, and “@mentions” of yourself.
Searching for instances of the word “report” from within the Teams client. Use the tab buttons to filter search results to just messages, just people, just files, and so on.
Your organization probably already has several teams that appear in your Teams client. To join an existing team, click Chat in the left navigation, and then under “Teams and channels,” click See all your teams. You’ll see teams you’ve already joined as well as public teams available in your organization for immediate membership.
Private teams are invite only; to join one, you respond to an invitation that comes from a current manager of the team.
You can also create teams ad-hoc (unless your administrator has disabled this option) to facilitate working together. When you create a team, Microsoft 365 automatically sets up a bunch of supporting apparatuses:
9. On the next screen that pops up, add members by typing their names or email addresses.
If Microsoft 365 is configured appropriately in your company, you can even invite guests from outside your organization, such as vendors and contractors, simply by typing their email addresses into the team-picking screen. Their “guest” status will be clearly denoted in all of their actions. (If you don’t have permission from your administrator to do this, Teams will report back that you are not authorized.)
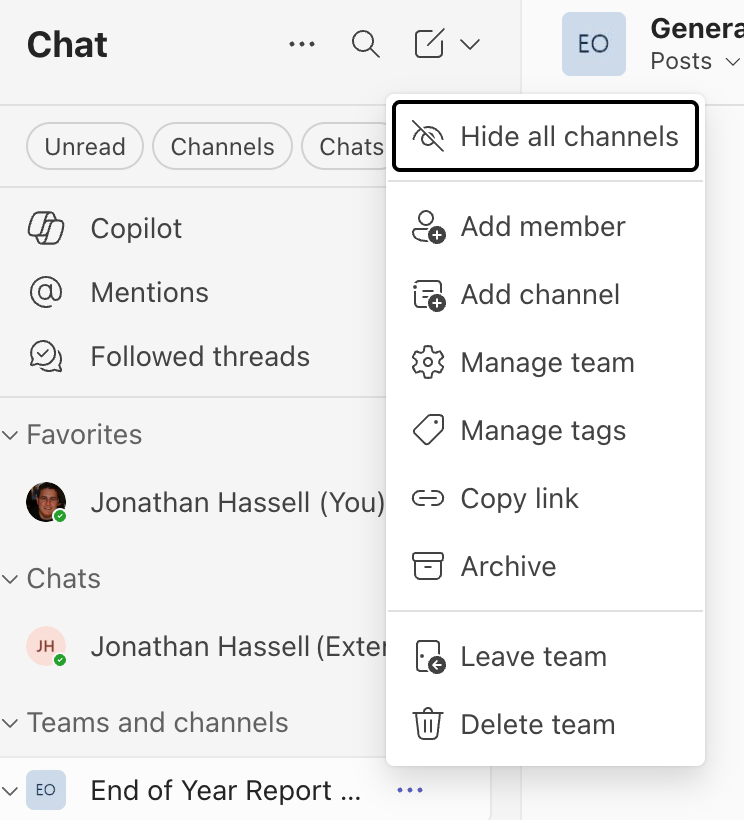
To manage your team at any time, click the three-dot icon next to its name in the sidebar on the left. You’ll see a pop-up menu where you can add or remove members, create channels for the team (more on that below), change the team name or description, and more.
Channels are where you converse and collaborate within a team. The General channel is meant to be a catch-all place where you go to start conversations when you first begin using the Teams product; usually more specific topic-related channels will spring from there.
You can create multiple channels for any given team — the Widget Launch team might want to have sales, production, and marketing channels, for example. To add a channel, click the three-dot icon next to the team name in the navigator bar on the left. You’ll see a pop-up menu, and then click Add channel. On the screen that appears, type in a name and a description for the channel, pick a privacy option if you want to limit the people who can access the channel, and click the Create button. All the channels for a team appear underneath the name of the team in the left pane.
Each channel has different pages that let you bring documents, apps, and websites directly into your channels for quick access. From the channel name, click the down arrow icon underneath, and you can choose from a new page, an existing page, other embedded Teams apps, conversations, files in the related SharePoint library, notes in a OneDrive shared notebook, or other items.
Common uses include pinning a specific Excel spreadsheet that your team updates frequently, a OneNote notebook for meeting notes, or a Power BI dashboard for tracking metrics.
The Posts tab in a channel kind of works like Facebook or LinkedIn in that you can comment to your teammates in an ongoing conversation. Channel managers can choose to have a traditional channel, where you just have posts, or a channel organized by threads where you can follow conversations and related activities. (See more on the new threads layout from Microsoft.)
Composing messages is straightforward: Just click the Start a new conversation text box, or click Reply below an existing conversation and start typing.
You can call teammates’ attention to certain parts of the conversation by tagging them with an @ sign when typing, like this: @Adele Can you share the latest workback grid? Users who have been tagged will see, in their own copies of the Teams clients, those tagged parts of the conversation highlighted in bright red so they can easily see and respond to messages. You can use emoticons, emojis, and GIFs as well — that’s what I mean by thinking of this area like Facebook.
While channels are great for team-wide or topic-specific discussions, chat provides space for smaller conversations.
Chats persist, so you can return to them anytime. They won’t vanish when you close Teams or log off for the day.
If you have an ongoing conversation and find you might want to add someone to a conversation, you can easily start a group chat: head up to the top right of your chat window, hit the three dots, click Participants, and from the pop-up submenu select Start a group chat.
You might be wondering when it’s appropriate to use a chat as opposed to convening everyone involved in a Teams channel. I suggest using channels for topics that need transparency and team-wide visibility. In contrast, use chat for quick questions, sensitive discussions, or conversations involving people outside your main team.
Teams offers robust calling and meeting capabilities, from quick calls to scheduled meetings with dozens of participants.
To make an immediate call, click Calls in the left navigation. On the Calls screen, start typing the name of the person you want to call, then select their name from the list that appears. Then click the Call button.
To schedule a call or meeting in advance, click Calendar in the left nav and click the New button in the top right corner. A “New event” pane pops up, where you can add a title, invite attendees, type a message, and add other information if desired. Alternatively, you can set up the meeting from Outlook. Either way, “Teams meeting” is selected by default as soon as you add attendees. You can also book a conference room or other shared resource here, too.
If you’ve been invited to a meeting or call, you’ll typically receive an email or other notification message with a meeting link or Join button. Click the button or link to join the call. For scheduled meetings, you can also click Calendar in the left navigation bar, click on the meeting, and click Join. If you have been sent a meeting invitation with an ID number, you can use the Join with an ID button at the top of the Calendar screen. Or if someone is just calling you ad-hoc, then you can choose to either accept the call without video, accept the call with video, or decline it on the pop-up that appears while the call is “ringing.”
Note: The first time you start or join a call in Teams, you’ll be prompted with a screen to help you set up your audio and video settings for that call. Also, on some systems, particularly Macs, you may be prompted to give Teams permission to record your screen, camera, or microphone. On Windows, your organization may have already given permission to Teams through its systems management software, and you may not be prompted. But if Teams is asking, click Allow to let Teams get the necessary access to each device.
Once you have accepted a call, you can control it using the buttons on the top of the call window, including a dial pad (for voice calls that need key presses); hold; transfer; chat; turn the camera and mic on or off; share content like an app, window, or screen; and then of course hang up the call.
If you have a webcam connected, Teams will grab that camera feed automatically. You can adjust cameras and backgrounds using the Camera button on the top bar. Blurring your messy room or switching to a solid color can often help reduce distractions in meetings. If you want to start the meeting with your camera off, just click the Camera button.
Using the Mic button and dropdown, you can select your audio devices, including your speaker volume. In most cases, Teams selects this correctly, but if you want to switch to a Bluetooth or USB headset, for instance, choose the right device from the Speaker and Microphone section of the right pane. (For headsets, you’ll most likely choose the same device for speaker and microphone.) If you want to start the meeting with your mic off, just click the button.
Under the More control, you can opt to record and transcribe a call, insert video effects, change audio, ask for translation options, and other settings.
To share other content with participants, click Share. You can then elect to share your screen, collaborate on a shared digital whiteboard, present a PowerPoint slide deck, or share individual files to your meeting participants without broadcasting them on the screen.
Teams integrates deeply with SharePoint and OneDrive, making file collaboration seamless throughout the platform. When you share files in a channel, those files are automatically stored in the team’s SharePoint site. Similarly, files that are shared in a chat are stored in your OneDrive for Business account.
The Files menu in a Teams channel offers several useful features for document management. It displays all documents that have been shared in that particular channel, allowing you to create new folders to organize your content, upload files from various sources, and open relevant libraries in SharePoint when you need to do so.
To upload files to Teams, you can navigate to the Files menu within a channel (remember, that’s the dropdown menu under the channel name). You can upload a file with the three-dot menu or create a new file of a typical type, like a Word document or Excel spreadsheet, using the + New menu. Alternatively, you can drag and drop files directly into the Files tab or even into a conversation thread for quick sharing.
When you need to work with files in Teams, you can edit them directly within the application. Office files can be edited right in Teams by simply clicking on a file to open it. If you prefer the full desktop experience, you can choose to open files in Word, Excel, or PowerPoint by selecting the Open in Desktop App option. Teams also supports co-authoring, which means multiple people can edit the same document simultaneously. Additionally, you can access the version history to review previous versions of documents through the three-dot menu.
Teams recently updated its interface to bring OneDrive functionality directly into the Teams environment. This integration allows you to access your personal OneDrive files without having to leave the Teams application, streamlining your workflow.
To access OneDrive within Teams, you can click on the OneDrive option in the left navigation panel. This integration makes it significantly easier to share personal files in Teams conversations without the inconvenience of switching between different applications.
Microsoft Loop components are collaborative blocks of content that can be shared and edited across Microsoft 365 apps, including Teams. These components function as living, shared content blocks that operate similarly to a task list, table, or paragraph, but with a key difference: they stay in sync across applications. When you create a Loop component in Teams and share it in Outlook, any edits made in either location will update everywhere the component appears.
There are several common types of Loop components available for different collaboration needs, such as:
To create a Loop component within your workflow, you begin by typing /loop directly into the compose box of a chat or conversation to access the component creation menu. Next, you choose the specific type of component you want to create based on your needs, whether that’s a list, table, paragraph, or another option. After selecting your component type, you add your content and click Send to share it with your team members.
Once the component has been shared, team members can click on the component to edit it collaboratively, with all changes syncing in real time across all instances of that component throughout Microsoft 365.
For a deep dive on Loop components, see “How to use Loop components in Microsoft 365 apps.” (There’s also a standalone Loop web app — see “Microsoft Loop cheat sheet” for details.)
Copilot Chat offers several powerful generative AI capabilities to enhance your productivity within Teams using Microsoft’s favorite new child, Copilot.
It can summarize recent chats and channel conversations, helping you quickly catch up on discussions you may have missed. The tool can also answer questions about your Teams activity, providing insights into your communication patterns and interactions. Additionally, Copilot Chat can help draft messages for you, saving time when composing communications. Beyond these specific functions, it provides general information and assistance across a wide range of topics and tasks.
To access Copilot Chat within Teams, you need to look for the Copilot icon, which can be found either in the left navigation panel or at the top of the Teams interface. Once you locate the icon, click it to open a chat window with Copilot. From there, you can ask questions or request assistance with whatever you need help with, and Copilot will respond to your queries.
This basic Copilot functionality is distinct from the more advanced Microsoft 365 Copilot integration which happens only with an additive license beyond the standard Microsoft 365 subscription. For organizations with Microsoft 365 Copilot licenses, Teams offers more advanced AI capabilities:
You might not have this level of license, as they’re relatively expensive — $30 per user per month at the enterprise level or $21 per user per month for companies with fewer than 300 employees. That’s on top of what your organization is already paying for Microsoft 365. Microsoft recently reported 15 million paid M365 Copilot seats — just 3.3% of the Microsoft 365 user base.
Here are some battle-tested tips for getting the most out of Teams and, perhaps more importantly, not letting Teams eat your workday and become the place where knowledge goes to die.
Managing notifications prevents Teams from becoming overwhelming. If you go with the defaults, Teams will buzz you — and your phone, too, if you have the companion app installed and set up — every time you get a call, message, or chat with an @mention to you. In a busy organization, this can drive you up the wall or result in your entire day being swallowed by Teams notifications.
Adjust everything to your preference. Teams is a very chatty app, so you may want to play around with these settings over time to find your particular sweet spot.
In addition to its built-in integrations with Microsoft 365 tools like OneDrive, Loop, and Copilot, Teams lets you bring a variety of Microsoft and third-party apps right into a channel or group chat. You can add apps for brainstorming, project management, polling, training, data visualization, sales, customer support, and countless other uses, allowing you to work in them without having to leave the Teams environment.
See “18 Microsoft Teams apps for content collaboration and management” for complete instructions on finding and installing apps, but in a nutshell, you click the Apps button in the left navigation bar, browse or search the available apps, and then install the one you want. (Note that your organization may restrict which apps you can install in Teams.)
Teams is definitely a big step up over endless email chains, but that doesn’t mean it’s suitable for everything. Here are two things to avoid:
Trying to replace all emails with Teams conversations and links. Sometimes we humans have a tendency to gravitate to whatever new features and tools there are, proclaiming them the “killer” of whatever came before and trying to force old square pegs into shiny new round holes. Teams is no different.
As an instant messaging platform, Teams is ideal for back-and-forth quick hits. If your message is longer than a paragraph, chances are, it should go back to email. Longer conversations, project planning, longer term development, all of those types of deep thinking and analysis are best suited for email. In email, you can sort, filter, set up rules, and do other automated things to manage how you see and find information. It’s not impossible to use Teams for longer conversations, but it’s suboptimal.
Trying to send emails to external folks. Unfortunately, there is no way for Teams to send email out to the internet, so unless you want to invite external users as guests into your team (assuming you have permission to do that), you will need to handle some subjects that involve people outside of your organization via old-fashioned email messages. That, of course, limits the utility of using Teams in projects or environments with a lot of collaboration with external users when they’re not a part of your Teams environment.
Your organization may restrict how external users can interact with your Microsoft 365 setup, usually via data loss prevention policies and prohibitions on folks outside your organization accessing Teams chats and channels. Ask your IT department if you have questions.
This article was originally published in March 2018 and most recently updated in April 2026.
Why it matters
News like this often changes audience expectations and competitors’ plans.
When one player makes a move, others usually react — it is worth reading the event in context.
What to look out for next
The full picture will become clear in time, but the headline already shows the dynamics of the industry.
Further statements and user reactions will add to the story.